
Learn to Play Chess
An engaging, step-by-step introduction to board setup, piece personalities, and foundational chess rules for young players, caregivers, and classroom instructors.
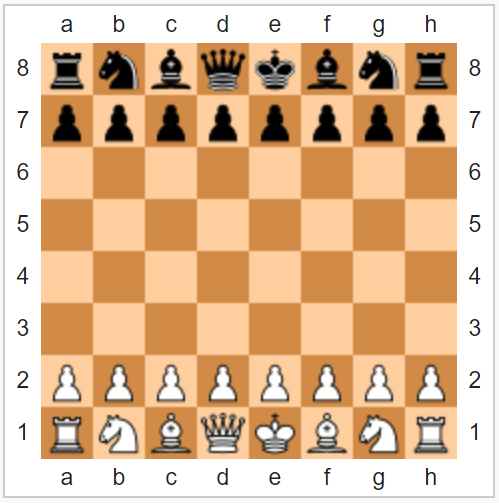
Step 1: Setting Up the Chess Board
Before any pieces make their first move, proper board orientation is essential. Every chess board must be oriented with a white (light-colored) square in the bottom right corner for both players:
Look at your bottom-right corner. If it isn't a white square, turn the board 90 degrees. Once the board is oriented correctly:
- Rooks anchor the corners like castle towers (a1, h1, a8, h8).
- Knights gallop right beside the rooks (b1, g1, b8, g8).
- Bishops flank their royal rulers (c1, f1, c8, f8).
- The Queen always sits on her matching color (White Queen on d1, Black Queen on d8).
- The King completes the royal back rank (e1, e8).
- The Eight Pawns stand courageously across the entire second rank!
Step 2: Meeting the Pieces Through Movement
At Smart Moves Chess, we teach each chess piece not as an abstract token, but as a memorable character with unique physical movement patterns:
The Ant Army
Pawns march steadily forward one square at a time (or two squares on their very first move). They capture diagonally, showing that small steps add up to big achievements.
The Leaping Frogs
The only piece that can jump over others! Knights hop in an "L-shape" (two squares in one direction, then one turn), making them tricky and surprising on the board.
The Diagonal Lasers
Bishops zoom as far as they want along diagonals. One bishop stays on light squares forever, while the other defends dark squares.
The Rolling Castles
Rooks travel in straight lines along ranks (side-to-side) and files (up-and-down), defending the kingdom with unwavering power.
Want to teach these concepts in your school?
Our complete movement-based curriculum includes physical games, stories, and turnkey lesson plans for preschoolers and elementary students.